What is HTTP? All you need to know, in plain English
This means:
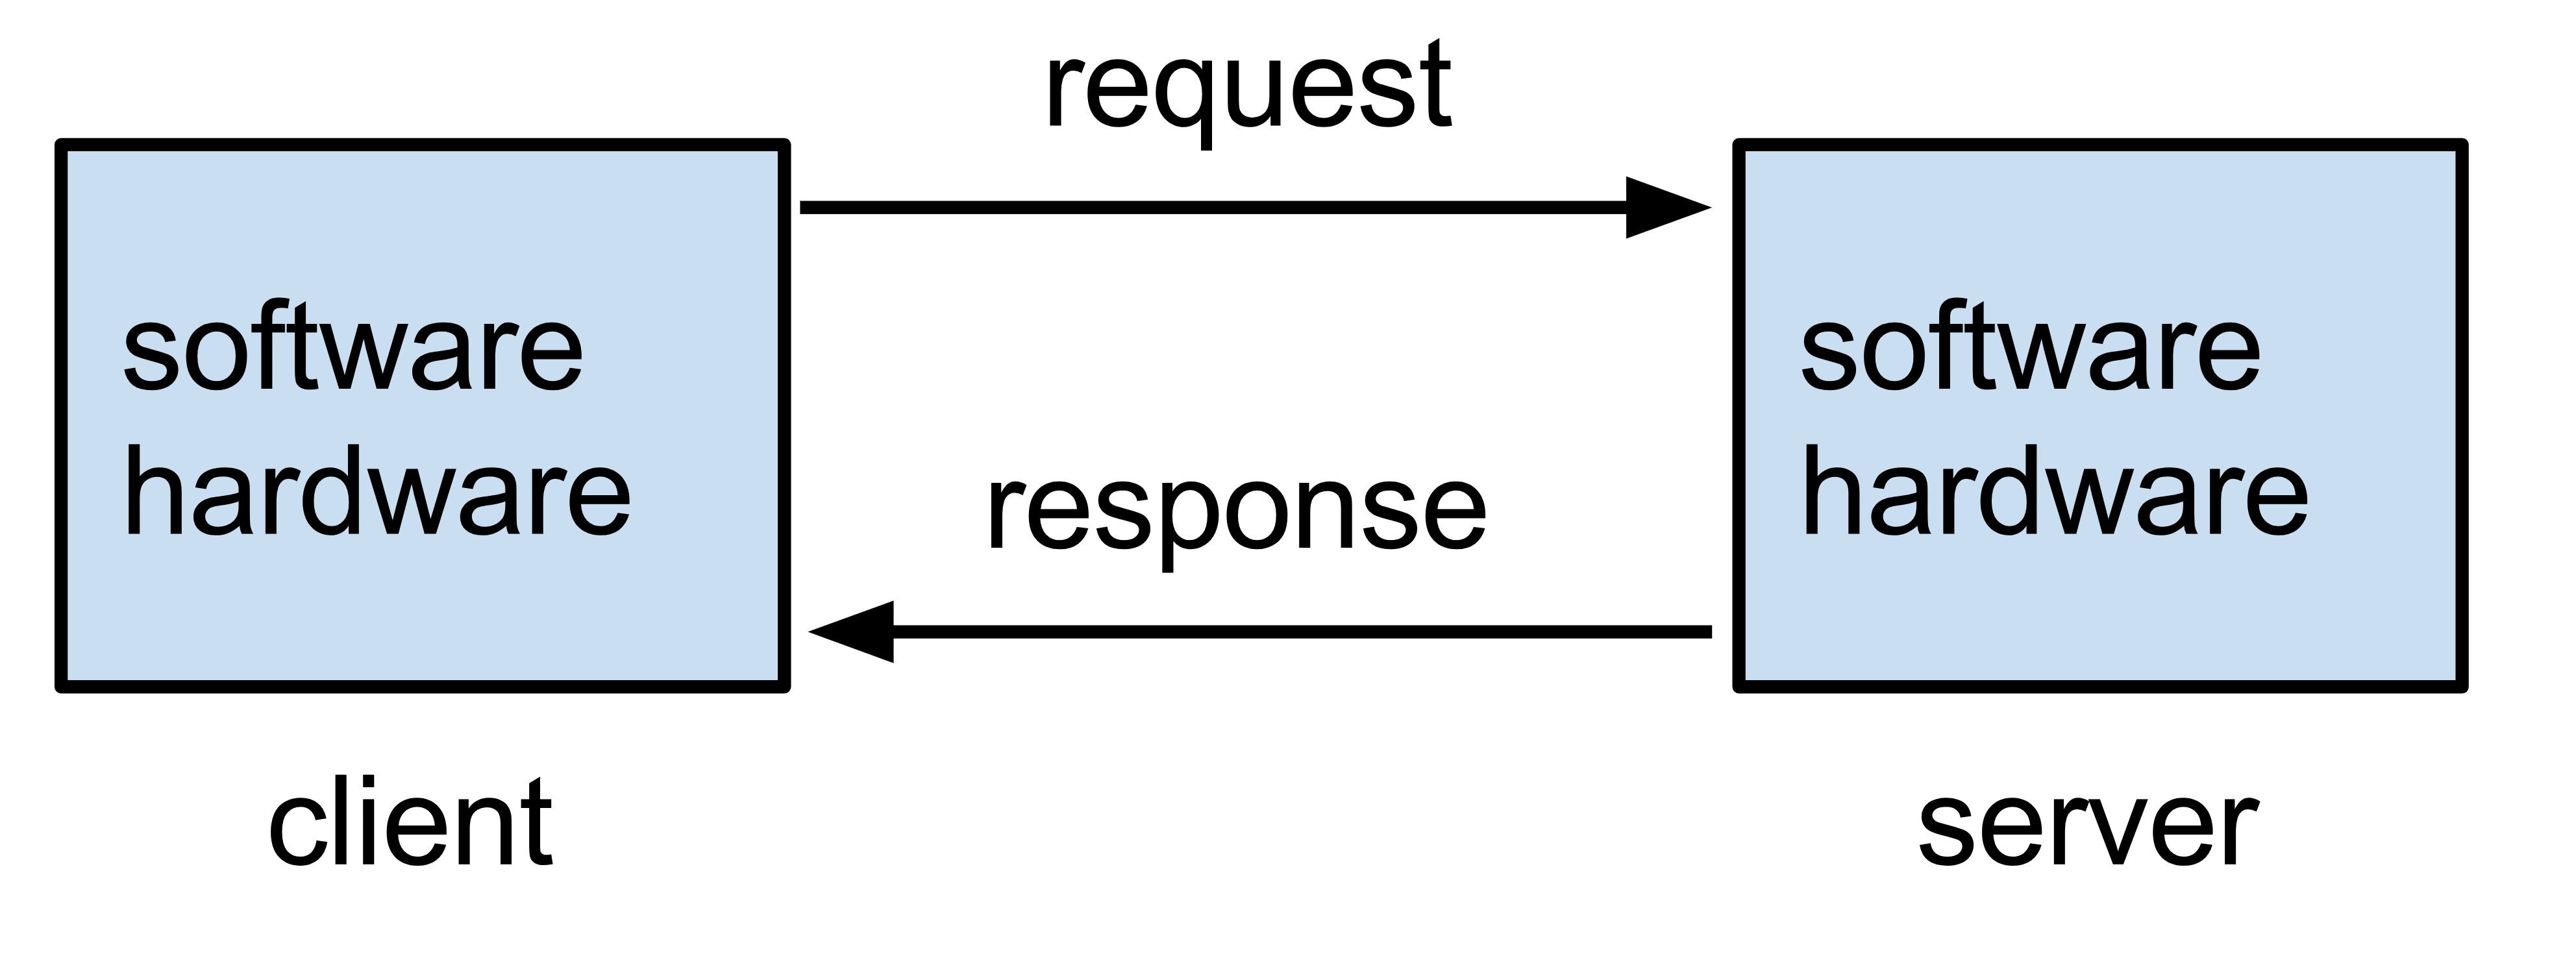
Any computer or device can use the services or download the resources hosted on another computer (the server).
To make a client-server transaction happen, server admins need to install a set of tools on their servers. And configure them to serve clients.
One of these tools is the webserver. A web server is a computer program, which serves various types of resources to clients over the web.
Often, the resource corresponds to a file (like an HTML page, an image, a video, etc.) or an API endpoint.
The client also needs to install a specific application – known as a client application – to access and use server resources.
When it comes to the web, that client application is usually your web browser.
In this case, the web browser (the client) communicates with the webserver.
Computer programs use communication protocols to interact with each other.
A protocol is nothing but a set of guidelines, which describe how two parties (e.g., a web browser and a web server) should communicate with each other.
One of the most used protocols on the Internet is Hypertext Transfer Protocol, known as HTTP.
HTTP describes how a client application should express its intention to a server and how the server should respond to the client. HTTP requests and responses are also called HTTP messages.
To establish an HTTP-based communication, both programs (client and server) should implement their communication mechanisms according to the HTTP guidelines.
On the other hand, both sides should understand and talk HTTP.
Most web browsers and web servers have an implementation of the HTTP Protocol in their software.
HTTP messages are like application forms we use in the real world.
Imagine you need to request a laptop from your company’s IT department.
You fill out a form designed especially for requesting equipment and hand it over to the guys at the IT department.
The form might look like this:
Purpose: Request a Laptop
Equipment: Macbook Pro M1 Pro
CPU: 10-core
RAM: 32GB
Disk: 512 GB SSD
Screen: 14 inches
When the guys at IT receive the form, they know how to deal with it. They process the application to know what specs you’re looking for.
And soon, you’ll receive your brand new laptop with a receipt; This is a protocol where both parties – you and the IT department – know how it works. A protocol to request equipment in a company.
When you access a website, your web browser initiates an HTTP request (like the equipment form) to get the web page (like the laptop) for you.
The web server (like the IT department) on the other end of the connection is awaiting incoming HTTP requests.
Once the webserver receives the HTTP request, it returns the proper response based on the details included in the request.
Just like the request equipment form, an HTTP request should contain information about your intention:
Request URL: …
Request Method: …
HTTP Headers: …
Message body (optional): …
What happens when you access a website
When you access a web page, the web browsers send tens of HTTP requests (depending on the number of assets on the page) until you get a working page.
Here’s how it works:
Whenever you access a web page, the web browser sends the initial request to fetch the respective HTML document.
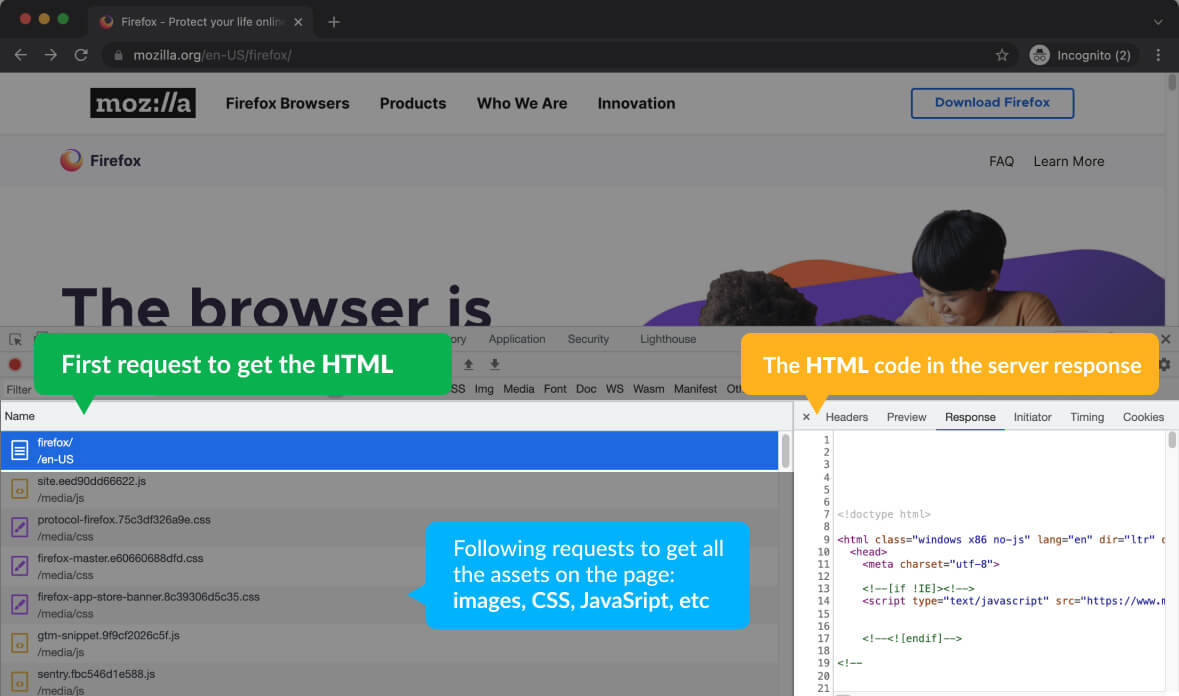
Once the HTML is received in an HTTP response, the browser starts parsing the HTML document.
At the same time, it runs a side process called the preload scanner. The Pre-load scanner’s job is to scan the document and download every asset on its way, such as images, CSS files, JavaScript files, videos, etc.
When the browser’s main thread (which is rendering the HTML) reaches an asset (like a CSS file or a JavaScript file), the file has been already downloaded, and it’s ready to be parsed – Thanks to the pre-load scanner.
Each asset is requested via an HTTP request. Needless to say, the server returns these resources in dedicated HTTP responses.
These are the requests the browser sends to load a page. However, there are also other requests initiated by the web page’s front-end code.
A simple example is when you fill out a web form and submit it. These code-level requests are coded with JavaScript by the front-end developers of the website.
How a request is handled by a server
Alright, let’s talk about what happens when a server receives the request.
An ordinary web server is usually configured like so:
If the Request URL refers to a file, the webserver returns the file content without further processing (in an HTTP response) to the client.
However, if the URL doesn’t refer to an existing file in the file system, the web server assumes the request is for an API endpoint or a web page with dynamic content.
In that case, the web server forwards the request to a back-end code to generate a response. Which back-end code the webserver should forward the request to is defined in the web server’s configuration.
It can be a WordPress CMS, a Laravel app, or a Node.js API. Simply put, it can be any type of code.
When the back-end code prepares the response, it returns it to the webserver, and the webserver returns it to the client.
And that’s how a response is prepared on the server-side.
Alright now that we roughly know what happens during an HTTP request-response, let’s see what are the most important elements of an HTTP message.
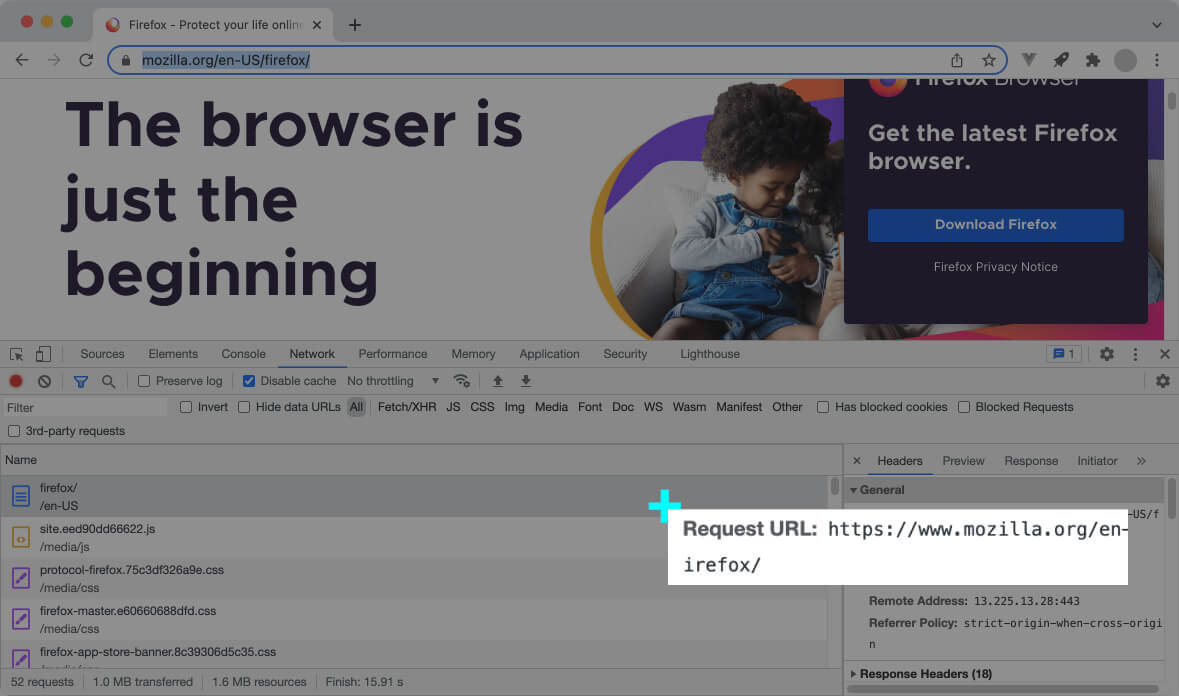
Request URL
The web server reads the Request URL to know what resource or endpoint the client is referring to.
Each resource is identified and located by a unique identifier called Uniform Resource Locator (URL).
Look at this URL: https://www.example.com/en/home.html
This URL locates an HTML file on example.com and consists of the following components:
- The URL schema https://
- The domain name www.example.com
- The path /en
- The filename home.html
Since the the Request URL refers to an HTML file, the server will return the content of that HTML file.
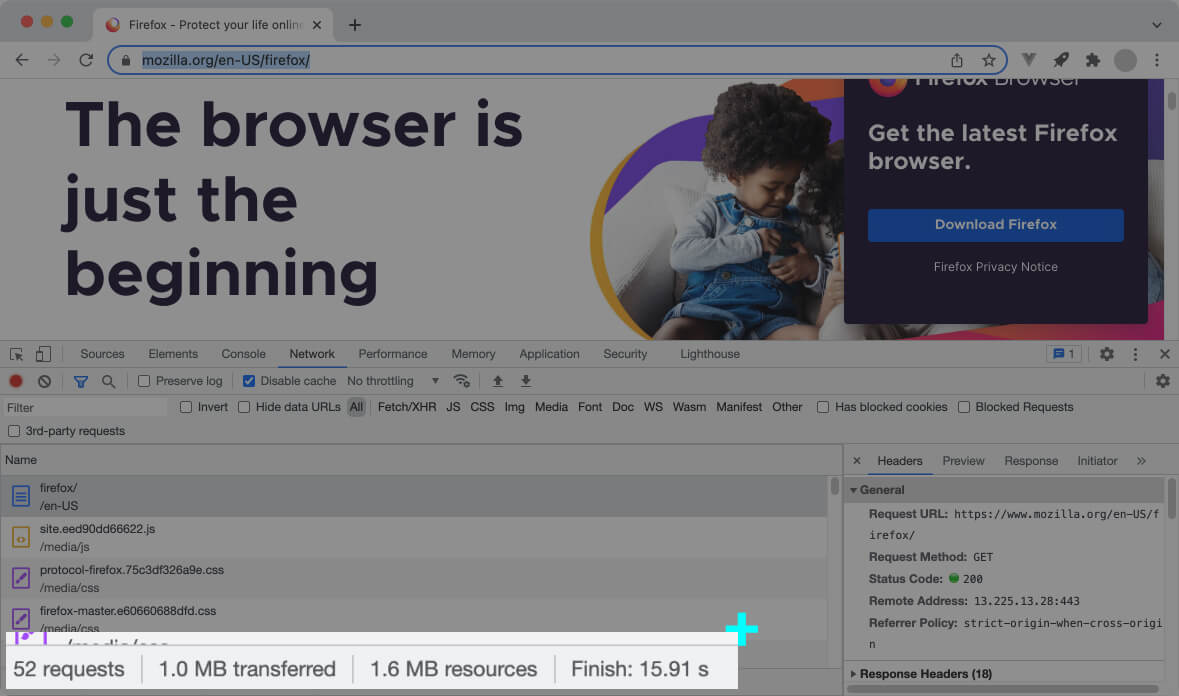
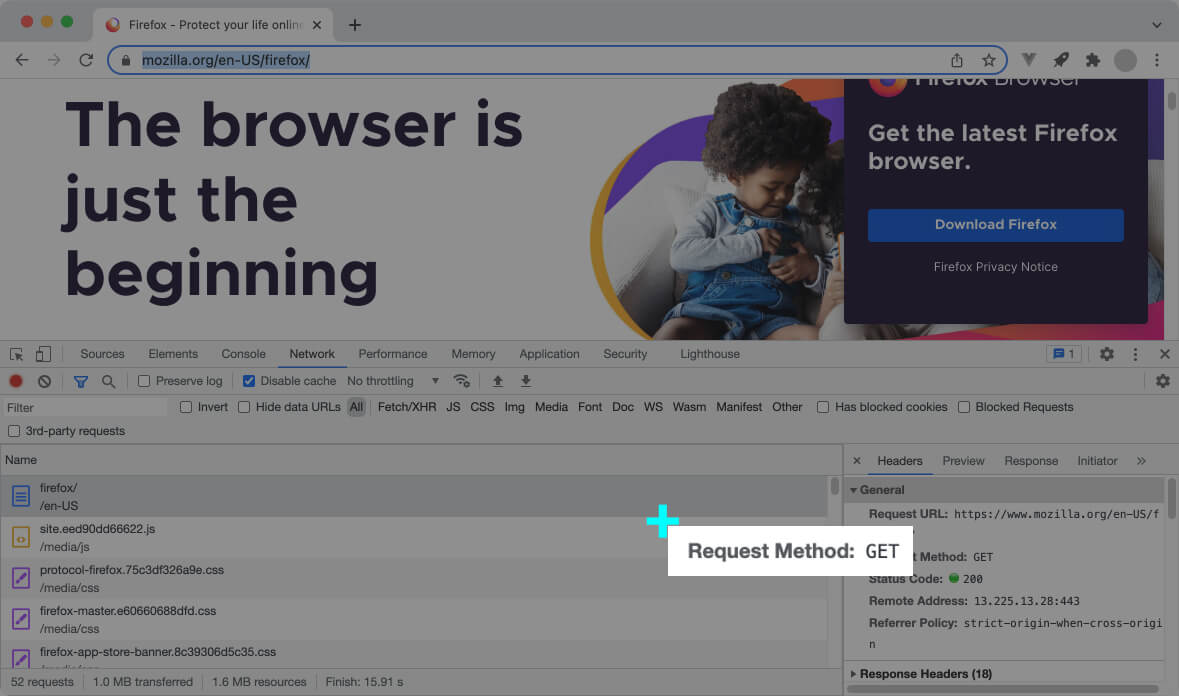
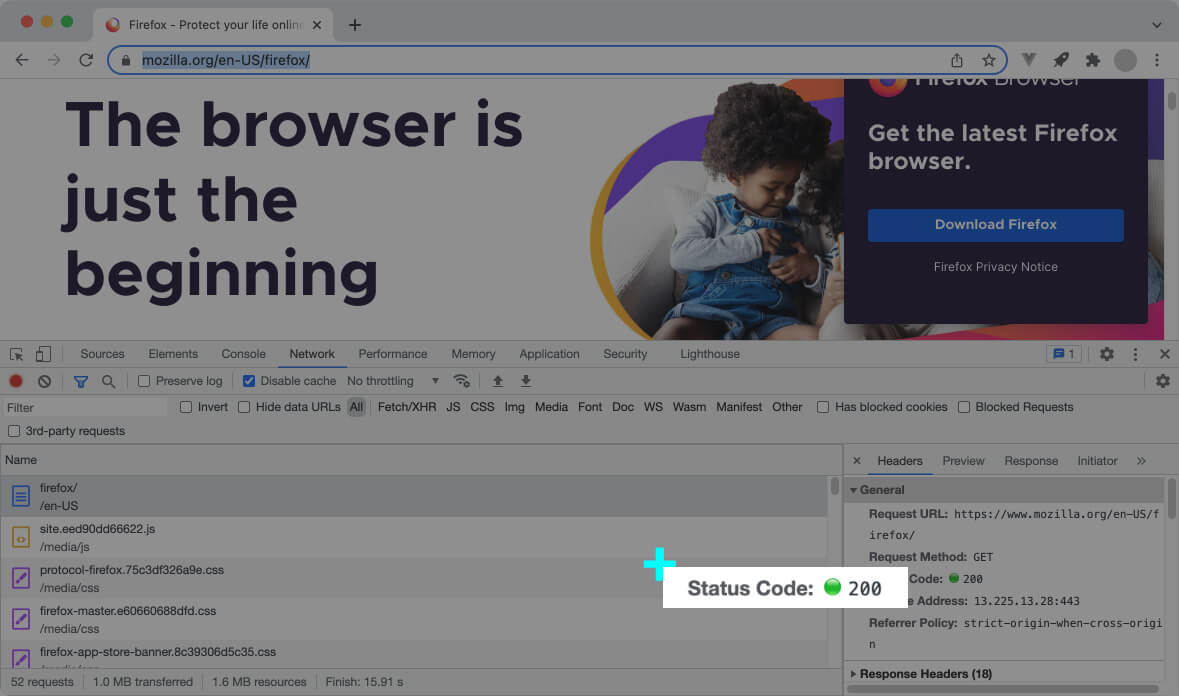
Here’s a real example of the first HTTP request sent by the web browser when you access a website:
In the above screenshot, the web browser requests Mozilla’s English home page https://www.mozilla.org/en-firefox/.
HTTP method
Besides the request URL, an HTTP request should contain another essential piece of information, the request method.
The request method helps the server understand what the client wants to do with the located resource.
The request method in an HTTP request usually contain one of the following:
- GET
- POST
- PUT
- DELETE
- HEAD
- CONNECT
- OPTIONS
- TRACE
- PATCH
GET is the most used request method, and it means the client only wants to download the resource.
Most of the HTTP requests the browser sends during the page’s initial load are GET requests.
The request method is informational and doesn’t add magical power to a request.
It’s just a signal for the back-end code so it can understand your intention. The reason is Two requests with the same Request URL but different Request Methods might require different handling by the back-end code.
For instance, if the [inline-snippet]Request Method[/inline-snippet] is POST, it means the client has posted some data to the server, and the back-end code should process it accordingly.
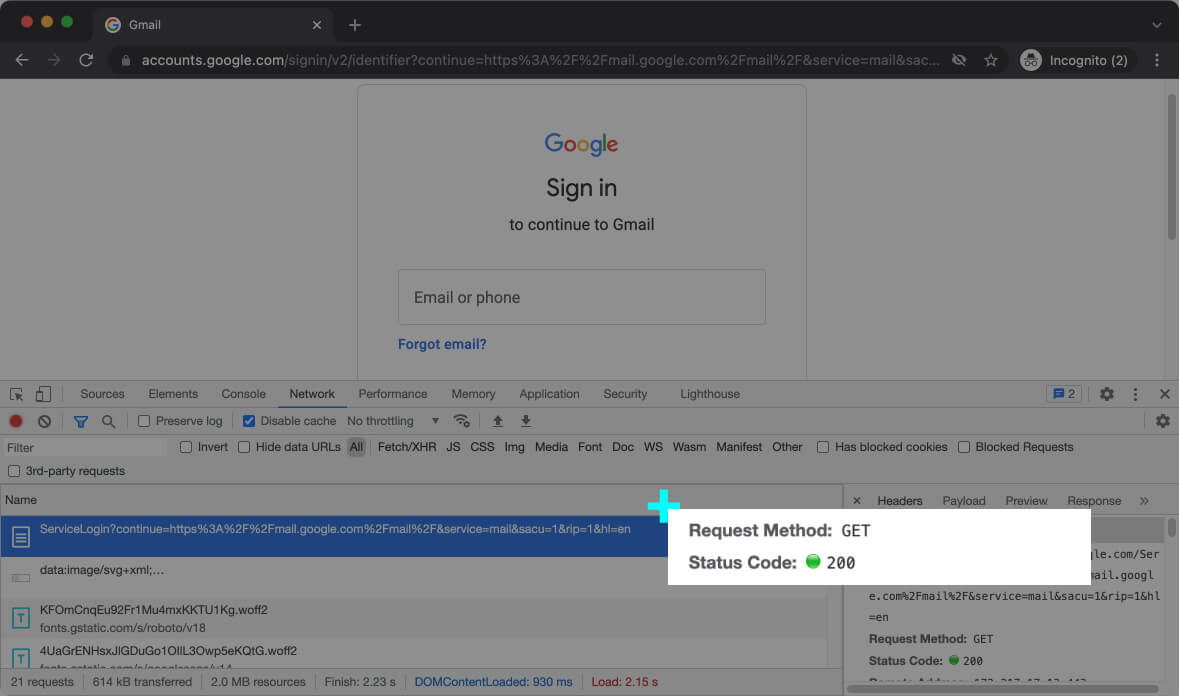
Here’s the request URL and the request method [inline-snippet]GET[/inline-snippet] when you access the Gmail login page:
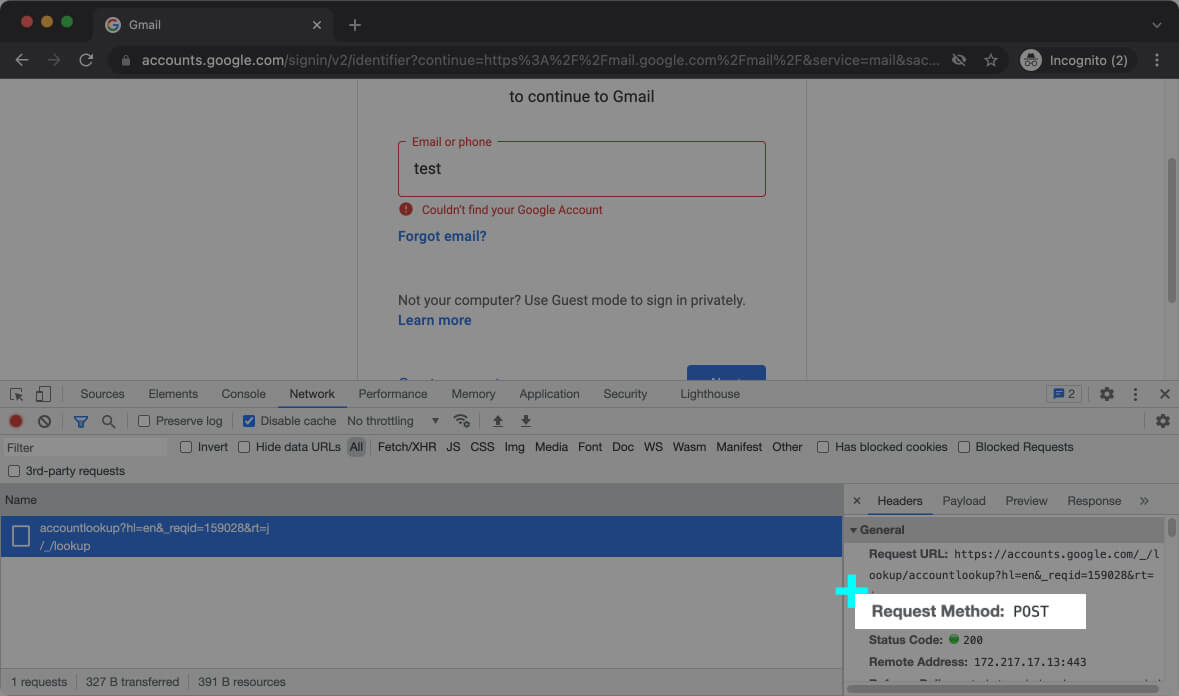
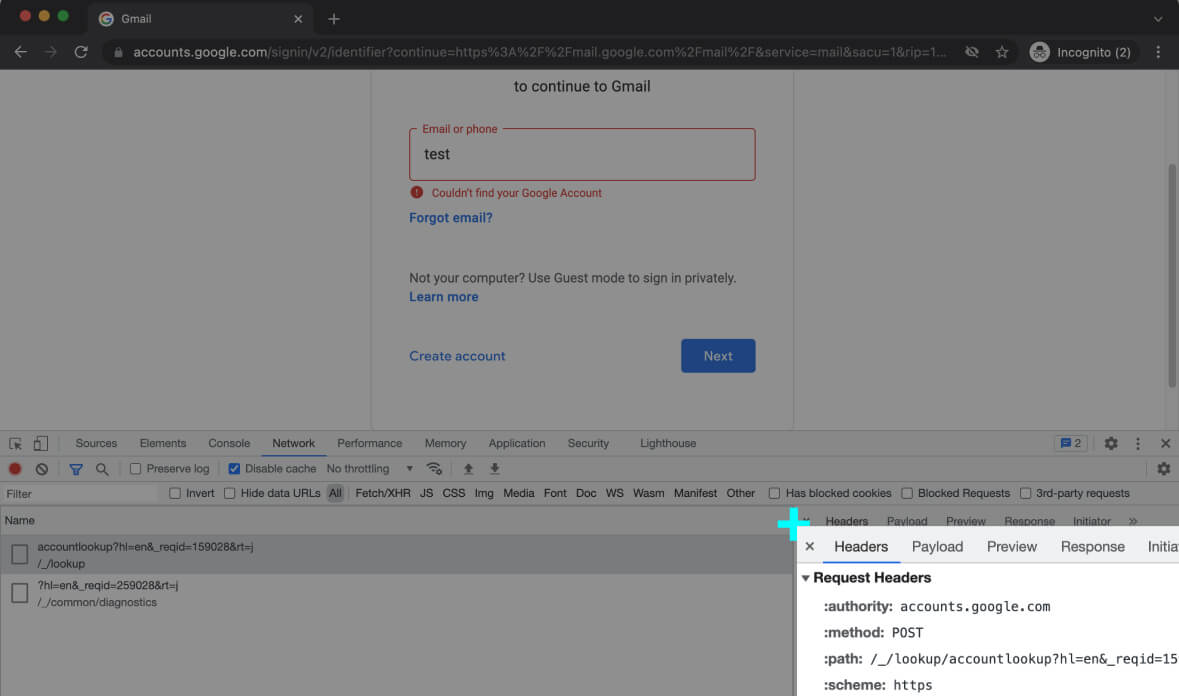
And here’s the request URL and Request method [inline-snippet]POST[/inline-snippet] when you enter your email and click on Verify.
Each of these requests will be handled by different pieces of code at the server-side. The web server passes it to the back-end code, and the back-end code dispatches the request to the proper handler – based on the [inline-snippet]Request URL[/inline-snippet] and the [inline-snippet]Request Method[/inline-snippet].
HTTP headers
Thanks to the Request URL and Request Method, the server knows what the client wants to do with the located resource (or action).
However, there are times when the back-end code needs more information. For example, it might need to know if the user is logged in or not. So it can return the proper page.
An HTTP request can carry additional information called HTTP headers.
HTTP headers provide the back-end code details about the request and the user. This information gives the back-end code more context and helps it provide a customized response for each user.
Headers can carry various information, like cookies, supported data compression formats, etc. A cookie header contains information about the user’s journey in the current visit (a.k.a session) or even their previous visits.
Headers aren’t just for requests, though. Server responses include headers too. The server response can include various headers to instruct the browser on how to process the response.
Let’s see this in action.
The below screenshot is when we try to access the Mozilla home page. One of the requests (among others) is a request to fetch the Mozilla’s logo.
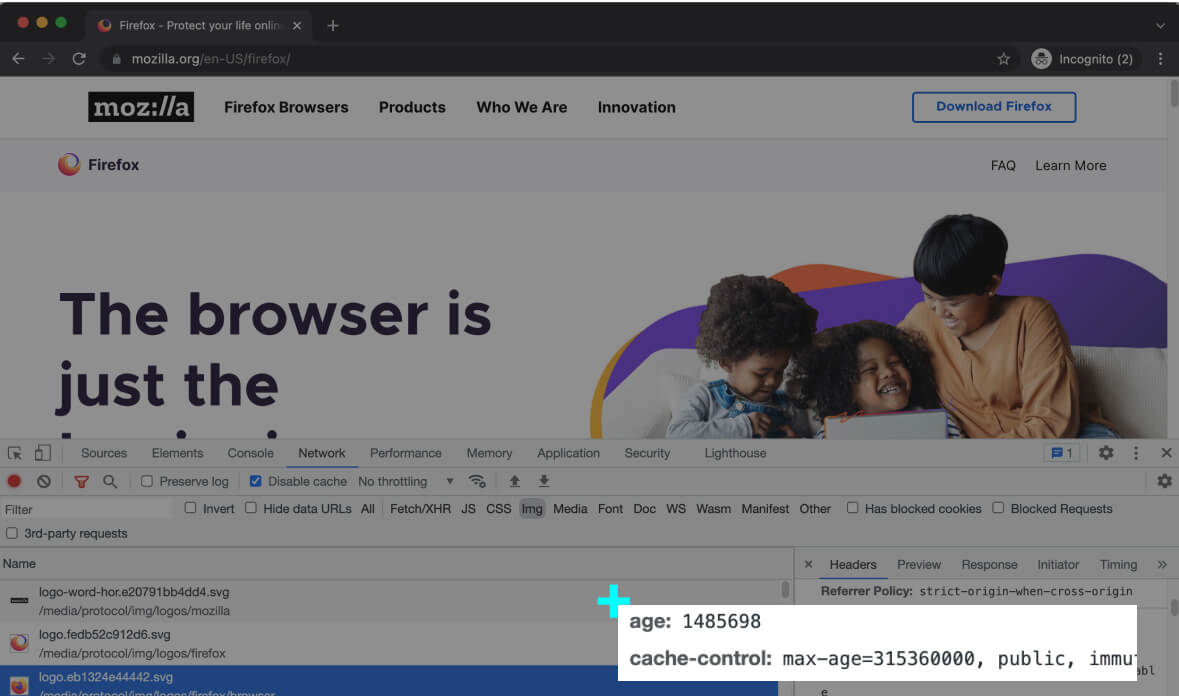
If we click on this request in the developer tools, we can see that Mozilla has included a cache directive cache-control in the response. This header instructs the browser to cache this image, and load it from cache in future visits.
The cache-control value in the above screenshot, is the number of seconds the cached content is valid for. The value 315360000 seconds equals 10 years, which is the standard value for caching assets, which aren’t expected to change anytime soon, like a logo.
As a result, the browser will load this image from the cache on the user’s future visits.
This is called browser-level caching.
You can read about all HTTP headers in the HTTP message header on the Mozilla website.
Status Code
The web server includes a status code with each HTTP response. A response status code represents the result of a request in numeric format; It’s usually a three-digit number starting from 1, 2, 3, 4, or 5.
The status code enables the initiator of the request (web browser or the front-end code) to know if the request was successful or not.
So it can process the response accordingly.
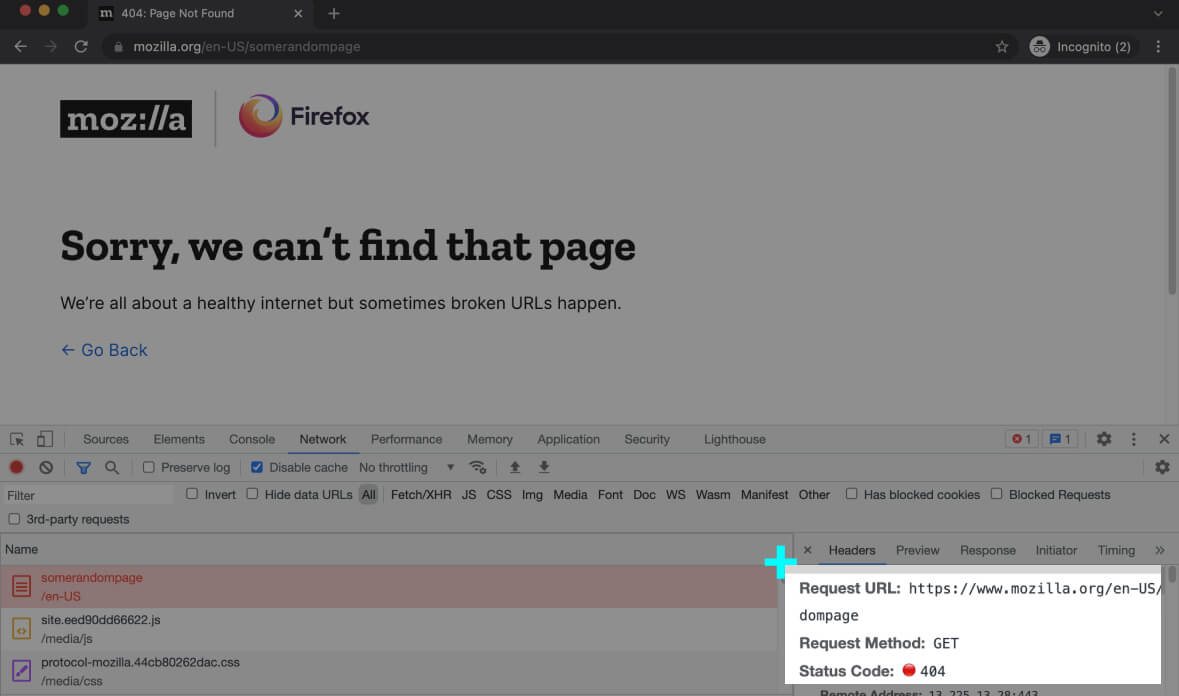
For instance, the 404 status code means the requested resource doesn’t exist on the server. You might have heard of the 404 code a lot.
The status code 301 says access to that particular resource is prohibited.
The status code 200 means the request was handled without a problem, and the response contains the data the user’s expecting.
Codes starting with 5 (e.g., 501) means there’s something wrong with the server, and there’s nothing you can do about it.
You can report the issue to the server admins or the back-end engineers, though.
You can see the list of status codes in MDN’s HTTP responses status codes guide.
So far, we’ve been exploring HTTP from a high-level perspective, the application layer.
How about we dive a bit deeper into the transport layer and see how HTTP messages are transferred over the wire?
Let’s get on to it.
What is a TCP connection?
Before the client (e.g., the web browser) begin sending HTTP requests, it has to open a connection with the webserver.
It’s like you dial your friend’s number on your phone, and when she picks up, you’ll start talking.
The TCP connection creates a reliable data transmission pipe to send data from the client to the server and back.
When the web browser composes an HTTP request, it streams the message to the TCP/IP program installed in your operating system.
Consequently, the HTTP messages are chopped into segments and placed into digital envelopes called IP packets and sent over the Internet – all the way to the destination.
A similar process also happens at the server-side, when the web server returns a response to the client.
Each Internet device (including your computer) is identified and located by an IP address.
You probably know what an IP address is, but just to make sure we’re all on the same page, here’s a one-sentence definition:
An IP address is like the address of a house and consists of a bunch of numbers separated by dots like 90.12.32.12 (IP version 4) or … (IPV6).
And to communicate with a device, you need to have its IP address.
IP addresses in a TCP connection come with another element, the port number.
A port number is like an extension number of an employee in an organisation’s phone system.
When you want to contact an employee, first, you dial the organization’s number, then dial a specific internal number to connect to that person.
The IP is like the main phone number, and the port is the extension. But instead of an employee, you’ll be connected to a program (the webserver in this case).
The port that a web server is listening to is usually 80 or 443.
Web browsers include the port (80 or 443) with each request, so you won’t have to worry about it.
Thanks to the layered design of computer networks, you won’t have to worry about any of these.
All you should care about is that all media on the web page are loaded one after another, and your interactions are handled promptly.
It’s the web page’s front-end code that asks for a resource or posts a piece of data while you’re interacting with the page.
And it’s the web browser, which carries out these communications in a set of very complicated processes.
And in a lower level, the TCP/IP program sends streams of data in IP packets across the Internet.
But how does the web browser knows the IP address of the server?
With the help of DNS.
What is DNS, and how it works?
Every HTTP request must be sent to the server’s IP address.
A domain name, such as decodingweb.dev is just a human-friendly name we associate with an IP address because remembering a name is easier than remembering numbers.
DNS or Domain Name Service is a decentralized naming system, which enables client applications to translate a domain name into its associated IP address.
On the other hand, DNS is the phone book of the Internet.
Think of a domain as the name of a person, and the IP address as their phone number.
Your web browser needs the server’s IP to establish a connection and start sending HTTP requests. Just like you can’t dial a name to call someone, the client can’t access a website via its domain name.
Here’s what happens when you type a domain name into the web browser’s address bar:
First, the web browser looks up the domain in its DNS cache to check if it’s already cached the IP information. Otherwise, it checks with the DNS stub resolver (a.k.a DNS client) of your operating system.
If the stub resolver has the domain’s IP information in its cache storage (in case another client application have requested it before), it sends it back to the web browser.
If it doesn’t exist, it issues a new DNS query to a recursive resolver.
What’s a recursive resolver? You may ask.
Recursive resolvers are servers usually managed by your Internet Service Provider (ISP), which handle DNS queries received from stub resolvers.
A recursive resolver starts a set of successive queries to find the name server, which holds the information about the domain being queried (including its IP address).
However, the resolver first checks if it has the IP or the address of the respective name server.
If it doesn’t have that data in its internal storage, it sends a query to a server called the DNS Root name server.
The DNS Root name server looks at the domain’s TLD (e.g., .com, .net, org, etc) and returns the address of a server, which has information about that particular TLD.
Until now, the resolver has the address of the TLD server (for instance, .com TLD server).
Knowing the TLD server’s address, the recursive resolver sends it a DNS query.
Consequently, the .com TLD server returns the address of all the authoritative name servers, which store information about the domain.
In the last step, the resolver sends a DNS query to one of the authoritative servers to get the IP address.
It’s like the IP address associated with a domain is stored in a book in a library. The recursive resolver is the librarian, who finds the section (root server), the rack (TLD server), and the shelf (authoritative server) to get the book you need.Once the recursive resolver has the IP address, it delivers it to the stub resolver, and eventually, it’ll reach your web browser.
Upon receiving the IP address, the web browser opens a TCP connection with the webserver and starts exchanging HTTP messages.
They say HTTP is a stateless protocol
You might have heard of this statement before: HTTP is a stateless protocol.
But what does it mean?
Here’s an explanation:
The web server doesn’t care if a request is related to the previous requests or not. In fact, it has no idea if the client sending the current request has sent other requests before.
Let’s think of a simplified scenario.
For instance, when you access your email client (let’s say Gmail), you will receive the login page – if you’re not signed in yet.
The login page is the back-end code’s response to your request. It’s an HTML document in the HTTP response’s body.
When you provide your credentials and click on Login, the browser sends another request (containing your credentials) to the webserver.
This process might be slightly different depending on how the front-end is coded.
A piece of code at the server side (based on the Request URL and Request Method) evaluates your login information to verify you are who you say you are.
If the authentication is successful, the web server’s response would be the HTML content of your inbox page.
When the inbox page is loaded, all the other assets (JS files, CSS files, etc) are also fetched in separate requests, to make the page fully functional. (Remember the browser’s parser and the preload-scanner?).
After that, let’s say you want to go to see your sent emails.
When you click on the “Sent” folder in your email client, the web browser sends an HTTP request to the server to get your sent emails from the API.
However, the server doesn’t necessarily know about your history and previous requests, meaning it doesn’t even know if you’re logged in your not.
It doesn’t know who you are because there’s no link between the current request and the previous ones.
It’s the web application’s job to create a session and make the related requests share the same context.
But how?
Do you remember how we could give context to a request with HTTP headers? That’s how application developers related requests in a visiting session.
Applications usually store your login status in a cookie, so your web browser can send your cookie data along with every following request to the webserver.
By reading the cookie, the back-end code at the server-side can learn everything about you. It’ll know whether you’re logged in or not, or even your whole journey during that session or days before.
And that’s why we say HTTP is a stateless protocol, but it can be session-aware with the help of cookies and the logic implemented in the back-end code.
The Evolution of HTTP
HTTP guidelines have evolved since their first release in 1991 (HTTP 0.9).
Most web browsers and web servers implement HTTP versions 1.1, 2, and 3 (which is still a draft). However, it’s up to the server admins to choose what HTTP version to use.
The more recent versions of the HTTP protocol are more efficient than the older ones.
For instance, HTTP version 1 opens a dedicated TCP connection for each request while HTTP 1.1 can reuse the same connection for multiple requests.
Since establishing TCP connections has a big overhead, reusing the same connection for multiple requests makes HTTP 1.1 faster than its predecessor.
HTTP 2 is similar to HTTP 1.1 with a few differences. For instance, it can push data to the client without receiving a request.
HTTP push is helpful when the client needs to constantly check if a piece of data has been updated on the server or not.
Imagine a website that displays real-time scores of a football tournament; it needs to continuously check the data at the server to see if the numbers have changed or not.
If the server uses HTTP 2, it can push data to the website front-end as soon as there’s a new update.
Otherwise, the front-end code on the web page would have to send a request to the server every few seconds to see if there’s a chance. This continuous checking is known as polling.
HTTP/2 is used by 46.8% of all websites, and it’s supported by most web browsers. It means it’s available to 97.59% of users.
HTTP/3 first drafts were published in 2020. However, it’s been already implemented by many major browsers, which means it’s available to ~73.5% of users. HTTP 3 uses QUIC + UDP instead of TCP. You can read more about it here.
HTTPS
HTTP transfers unencrypted data by default. This means an attacker is technically able to read your HTTP messages while in transit.
Imagine you’re placing an order on a shopping website and input your credit card details at checkout.
Guess what? When you click on Confirm purchase, your credit card details will travel across the Internet as plaintext – visible to any man in the middle.
They can even inject malicious code into the returned HTTP responses from the server without you noticing it; This is called a man-in-the-middle attack.
As a result, the login page you see might be sending your username and passwords to a hacker.
Don’t panic, though! Nowadays, most websites encrypt your data before it’s posted over the wire.
The HTTP requests and responses are encrypted with a sophisticated cryptographic protocol called TLS (a.k.a SSL) before they are freed into the wild.
This bi-directional data encryption guarantees that no one can access or tamper with your data while in transit.
A website that implements SSL/TLS, has “HTTPS” in its URL instead of “HTTP.”
TLS is a communication protocol for securing HTTP messages. It’s the successor of an older protocol called Secure Sockets Layer (SSL) which continued until version 3. It was then renamed to TLS due to ownership transfer from Netscape to Internet Engineering Task Force (IETF).
So when we say HTTP, we’re not referring to a new protocol; It’s just the good old HTTP secured with TLS. It’s also known as HTTP over TLS.
TLS is currently at version 1.3.
Even though SSL is a deprecated encryption protocol, the term SSL is still widely used due to its popularity. Just remember the terms TLS or SSL both refer to the TLS protocol.
TLS can also be used to encrypt other communication types such as email, messaging, and voice over IP (VoIP).
But what does it mean to encrypt an HTTP message? You may ask.
Here’s an explanation.
TLS encrypts the whole HTTP message. This includes the Request URL, Request Method, headers, etc.
This message-level encryption protects your personal information (usernames, passwords, credit card data, etc.) and browsing data against eavesdroppers.
The IP address and port number wouldn’t be concealed, though. The reason is they are managed by TCP/IP at the transport layer.
The full URL is still encrypted because it’s located inside the HTTP message (in the Request URL).
That being said, technically, attackers can see there’s a communication going on between a client and a server, but they won’t be able to see the content of the messages.
All they see would be a garbled mix of characters that is nearly impossible to decrypt. So they won’t even bother tapping on the wire.
How to use HTTPS
To use HTTPS:
1. the website you’re visiting must have configured its web server software to serve HTTP content over the TLS protocol.
2. You need to make sure you’re using the https:// schema in the URL.
Most web browsers force the https:// schema. So whenever you input a domain in the address bar, you can see the schema is automatically set to https://.
When a server admin wants to enable TLS encryption, the first step would be to purchase an SSL/TLS certificate (There are free options too).
A certificate is in the form of a file issued and digitally signed by a credible certificate authority to the person or business that owns the domain.
The certificate contains information about the owner of the domain.
When you access a TLS-enabled website, after the TCP connection is established, several messages are exchanged between the client and the server.
This is called a TLS (or SSL) handshake.
The web browser and the web server perform this ritual to agree on a few things:
- What TLS version to use
- Which encryption algorithms (a.k.a cipher suits) to use for message encryption
- Generate a session key
- Share SSL/TLS certificates
Here’s what TLS handshakes look like:
First, the client (your web browser) sends a hello message to the server. The client also indicates the TLS version it supports, its preferred cryptographic algorithms (a.k.a cipher suites), and a string of random bytes known as client random.
This random string is the first of the three random strings exchanged between the client and the server.
The client and the server use these random strings to generate the session key, which will be used (along with the cryptographic algorithms) to encrypt HTTP messages later on (more on this below).
Next, the server responds to the client’s hello with a hello message. This message also contains the selected TLS version, the selected cipher suites (supported by the client), a session ID, another random string called server random, and its SSL certificate.
In the next step, the client verifies the authenticity of the server’s SSL certificate and its issuing authority (a.k.a CA).
Web browsers know how to trust a certificate based on the list of approved certificate authorities that come pre-installed in their software.
Most browsers display a warning if they receive an invalid certificate or a certificate from a noncredible authority (e.g., self-signed certificates).
Each certificate is also bound to a cryptographic key pair: a public key, and a private key.
The public key is included in the certificate and shared with the browser. However, the private key is kept secure at the server and isn’t shared with anyone.
The private key is used to digitally sign HTTP responses.
The private key can also decrypt messages encrypted with the public key; This is only used during handshake.
The web browser uses the public key to verify the integrity of responses digitally signed and returned from the server. This ensures the server response remains intact until received by the browser.
It’s like a candle seal, which assures you sure nobody has opened (and altered) the envelope’s content before.
After the web browsers make sure it’s communicating with the owner of the domain, it sends back the last random string, known as the premaster random.
However, before the client sends the premaster random, it encrypts it with the public key included in the SSL certificate.
Needless to say, when the server receives the encrypted premaster random, it decrypts it with its private key.
So far, both the server and the client have the three keys: client random, server random, and premaster random.
Next, they attempt to calculate the session key on their own! The result of both calculations is expected to be the same. With this asymmetric approach, both the server and the client can have the same key without having to exchange it over an unsecured network such as the Internet.
It’s only after generating the session key that data can travel securely.Now, the client sends a finished message encrypted with the newly generated session key.
In response, the server sends back a finish message, also encrypted with the session key.
The handshake is completed, and now HTTP messages will be sent encrypted with the generated session key.
Based on Wikipedia:
“As of April 2018, 33.2% of Alexa top 1,000,000 websites use HTTPS as default,[15] 57.1% of the Internet’s 137,971 most popular websites have a secure implementation of HTTPS,[16] and 70% of page loads (measured by Firefox Telemetry) use HTTPS.”
How to get an SSL certificate
If you’re the admin of a website and want to enable TLS for your server, you need to obtain an SSL certificate.
There are many certificate authorities you can buy a certificate from. Technically, you can even create a self-signed certificate yourself.
However, the web browser would only trust certificates issued by approved authorities.
One of the best ways to get a certificate is to use Let’s Encrypt. Let’s Encrypt is a non-profit certificate authority run by Internet Security Research Group, which provides TLS certificates for free.
They are sponsored by big companies such as Google, Facebook, Mozilla, Amazon, and many more.
Let’s Encrypt was started by two Mozilla employees in 2012 to provide free encryption for Internet users. So there’s no excuse for a website not to use SSL/TLS encryption in 2021.
Let’s Encrypt certificates are valid for 90 days but you can renew anytime. You can even automate your renewal so you won’t have to worry about renewal at all.
Using Let’s encrypt is super easy. Certificate creation, installation, and web server configuration happen automatically by just running a command or two on your terminal.
And Boom, you’re HTTP traffic is secured – for free.
Wrapping in Up
In this guide, you learned the foundation of Internet communications, HTTP. How HTTP messages look like, and how they are exchanged between the client and the server.
You also learned about the DNS system, which resolves domain names to IP addresses.
And we finished the guide with HTTP over TLS and certificate creation.

Reza Lavarian Hey 👋 I'm a software engineer, an author, and an open-source contributor. I enjoy helping people (including myself) decode the complex side of technology. I share my findings on Twitter: @rezalavarian
Never miss a guide like this!
Disclaimer: This post may contain affiliate links. I might receive a commission if a purchase is made. However, it doesn’t change the cost you’ll pay.