Front-end skills you need to start web development
In the next section, I’ll cover the most essential tools & concepts you need to know to introduce yourself as a front-end developer.
Let’s dive in.
In the next section, I’ll cover the most essential tools & concepts you need to know to introduce yourself as a front-end developer.
Let’s dive in.
HTML (HyperText Markup Language)
HTML is the base technology behind any web page; That’s why website pages are also called HTML pages.
A website typically contains several HTML pages that are connected via hyperlinks.
HTML describes the content on a web page via a set of special annotations called HTML tags.
For every element on a web page (like headings, paragraphs, buttons, links), there’s an HTML tag.
HTML describes the hypertext in a web page, so the web browser (which renders the page) can understand what they mean and how they should be displayed.
For example, this is how you emphasize a word in HTML code:
Hi, <em>Tim</em>
Most HTML tags come in pairs, and surround a piece of text to describe its purpose.
For instance, when <em> surrounds a piece of text, the web browser will know that it has to emphasize that text and display it in bold.
If you save the above code as a file with a .html extension and open it up in a web browser, you’ll see something like:
Here’s how we create a list on a HTML page:
<ul>
    <li>Item 1</li>
    <li>Item 2</li>
    <li>Item 3</li>
</ul>
And here’s how the web browser renders it:
- Item 1
- Item 2
- Item 3
A front-end developer creates the elements of a web page by combining HTML tags.
HTML tags should be wrapped within a pair of <html> tags:
<!DOCTYPE html>
<html>
    <head>
        <meta charset=”utf-8″>
        <title>My test page</title>
    </head>
    <body>
        <img src=”images/image.png” alt=”My test image”>
        Hi, <em>Team</em>
    </body>
</html>
Example of a valid HTML document
Learning HTML is essential for both front-end and back-end developers.
The good news is, it can only take a day or two to learn the basics and create your first web page with HTML.
Focus on these concepts when learning HTML:
CSS (Cascading Style Sheets)
You will use HTML to define web page elements for what they are, rather than how they should look.
How they should look is the responsibility of HTML’s long-time partner, CSS.
CSS separates formatting from content.
- Style your text (set a color, choose a font, etc.)
- Decorate any element such as buttons, fields, containers, hyperlinks, etc
- Make responsive layouts to make your web page look good on all devices
- Reset browser’s default styling (Cascading)
- And a lot more
You will write CSS styles as rule sets, known as style sheets.
Each style sheet contains a set of visual properties that define how an HTML element (such as a button or link) should be displayed.
Each style sheet consists of a selector and a declaration block {}.
.selector-name { color: red; width: 100px;}A selector defines what elements on the web page should be affected by this class.
We associate these selectors to the respective elements on the document.
As an example, let’s create a button with HTML and then style it with CSS.
<button>Click me!</button>
Without CSS, the button will look like this:
So basic, right?
Now, let’s add a bit of style to it with CSS:
.click-me-btn {
    font-size: 1rem;
    border: blue 1px solid;
    background: blue;
    color: #fff;
    font-weight: 600;
    padding: 5px 10px;
}
In the example above, .click-me-btn is an arbitrary selector name.
And the pair of curly brackets is a declaration block that surrounds a set of visual properties, like font-size.
These properties define the look and feel of elements affected by this class.
When we have a style sheet, we can apply it to any HTML element that we want.
To use the above style sheet, you’ll just need to associate the selector (.click-me-btn in this case) to the respective elements class attribute:
<button class=“click-me-btn”>Click me!</button>
All HTML elements can have the class attribute.
And this is what you’ll get:
Everything looks better with a touch of CSS.
We could even use a tag name as the selector.
In that case, all buttons would be affected by the style sheet, not just those with class=“click-me-btn”.
button {
    font-size: 1rem;
    border: blue 1px solid;
    background: blue;
    color: #fff;
    font-weight: 600;
    padding: 5px 10px;
}
Please note that when using tag names you don’t have to put a dot (.) before the selector name.
A CSS file can contain hundreds of style sheets.
Specificity
When two different style sheets target the same HTML element, the browser needs to decide what CSS property values are more relevant to style that element.
CSS Specificity is a great feature when you want to reuse an existing style sheet for a set of elements, but you also want to override one (or more) of its properties for one of those elements.
Let’s think of an example.
Imagine you want to use the button stylesheet to style every button on your page.
Based on this style sheet, all the buttons would be blue with a white label.
However, there’s one button you want to be red.
Here’s how we achieve it:
button {
  font-size: 1rem;
  border: blue 1px solid;
  background-color: blue;
  color: #fff;
  font-weight: 600;
  padding: 5px 10px;}

.special-button {
  background-color: red;
}
And add the .red-button selector to the respective button element:
<button>Button 1</button>
<button>Button 2</button>
<button>Button 3</button>
<button class=“special-btn”>Button 4</button>
As a result, all buttons would be the same but the last one would be different in color.
Since the last element is effected by two style sheets (button and .special-button), their properties are merged. However the browser needs to decide which background-color to choose.
The browser finally chooses the background-color defined in .special-button. The reason is selectors with arbitrary names have higher priority over tag names.
Read more about CSS specificity on the Mozilla website.
You will save CSS files as plain-text files with a .css extension (e.g., styles.css.)
CSS files are loaded into HTML pages with the <link> tag.
<!DOCTYPE html>
<html>
    <head>
        <meta charset=“utf-8”>
        <title>My test page</title>
        <link rel=“stylesheet” type=“text/css” href=“styles.css”>
    </head>
    <body>
        <img src=“images/image.png” alt=“My test image”>
        Hi, <em>Team</em>
    </body>
</html>
CSS Frameworks
CSS frameworks are a collection of pre-made CSS style sheets that you can use alongside your CSS style sheets.
Why?
To avoid writing everything from scratch.
The primary purpose of CSS frameworks was to provide a CSS layout system.
A layout system is a collection of CSS style sheets for making complex layouts on a web page, which helps you position page elements wherever you want on the page.
Additionally, CSS frameworks provide ready-to-use style sheets for other HTML elements.
So, the only thing you’d have to do is to memorize the respective selector names and associate them with your HTML elements.
The most well-known CSS frameworks in the market are Tailwind CSS, Bootstrap, Materialize CSS, and Foundation.
Should you use a CSS framework or not is up to you.
However, they can save you a lot of time in particular cases.
But before everything, it’s essential to learn the standard CSS.
- Common CSS properties
- Media Queries
- Specificity (to determine style-sheet priority)
- CSS Pseudo-elements
- Box Model
- Flexbox
- CSS Grid
- CSS transitions and animations
Responsive design
Responsive design is an approach to make a web page display and function correctly across all device sizes and orientations.
A Responsive web page should look on a mobile screen as good as it does on an ultrawide monitor.
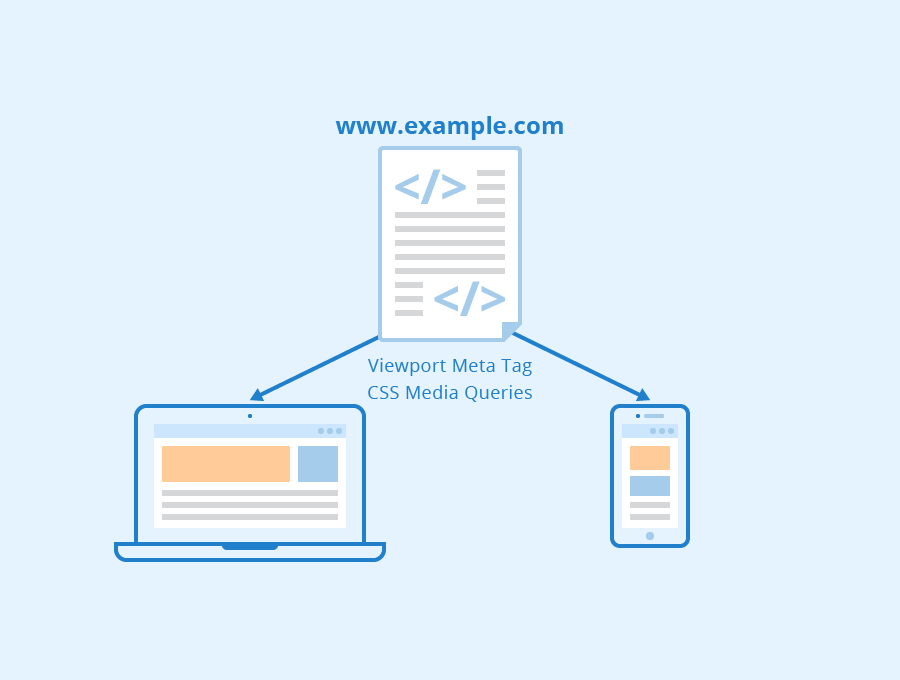
Responsive web design – Author: Seobility – License: CC BY-SA 4.0
Responsive design is crucial for online businesses; On average, around 65% of website traffic comes from mobile devices.
Now, imagine a web page, which is not usable for 65% of its visitors!
That is crucial, indeed.
You’ll achieve responsiveness via a core feature of CSS called Media Queries.
Through Media Queries, you can define certain CSS style sheets for particular screen sizes.
If you open a website’s CSS file, you’ll see plenty of media query blocks like the following:
.button {
  width: 200px;
  height: 5px;
  border: #ccc 1px solid;}

  @media_query (max-width: 561px) {
    .button {
    width: 100%;
  }
}
In the above CSS, we have a style sheet with a selector named .button.
We also have a @media_query block, which overrides the width property of the .button class on mobile devices – a device with a maximum width of 561px.
That’s how websites are adjusted based on different screen sizes in CSS.
JavaScript
JavaScript is a lightweight programming language known as the scripting language for web browsers.
You will use JavaScript to add interactivity to web pages.
JavaScript, alongside HTML and CSS, is the cornerstone technology of the web.
Please note Java and JavaScript shouldn’t be mistaken for each other. They are entirely different languages, even though they have slight syntax similarities.
You can hardly find a modern web-based system that’s not using JavaScript.
- Manipulate elements of a web page on the fly as a response to users’ interactions, such as hiding elements, resizing them, repositioning them, removing them, etc
- Validate form data, after the user submits a form
- Create interactive components such as image sliders, accordion menus, date pickers, color pickers, etc
- Web-based calculators, like an income tax or personal loan calculators
- Create cool animations
- Create browser-based games
- Interact with a web API (more on this below)
- And a lot more.
Just like CSS, you will write and save your JavaScript code in plain-text files but with a .js extension.
You’ll load JavaScript files in your HTML pages by <script> tag.
It’s usually included right before the closing body tag </body>:
<!DOCTYPE html>
<html>
  <head>

    <meta charset=“utf-8” />

    <title>My test page</title>

    <link rel=“stylesheet” type=“text/css” href=“styles.css” />
      </head
  >
  <body>
        <img src=“images/image.png” alt=“My test image” />    Hi,
    <em>Team</em>
    <script type=“text/javascript” src=“script.js”></script>

  </body>
</html>
JavaScript engines
When a web browser realizes you’ve included a JavaScript file on your HTML document, it downloads the JavaScript file and executes it.
Web browsers have a JavaScript engine built into them that interprets the JavaScript code.
Each web browser vendor has its implementation of a JavaScript engine.
For instance, Google Chrome and other chromium-based browsers call their JavaScript engine V8.
Firefox calls its JavaScript engine SpiderMonkey, initially developed at Netscape but is currently maintained by Mozilla.
Web browser vendors (such as Google or Mozilla) must implement their JavaScript engines based on a language standard called ECMAScript – by ECMA International.
ECMAScript ensures different browsers run JavaScript code consistently.
Every once in a while, ECMA International publishes a new edition of ECMAScript, introducing new language features in JavaScript.
These editions are known among developers as ES6, ES7, ES8, etc.
Consequently, all web browser vendors have to update their JavaScript engine based on the new standards.
This means, if you’re using a new language feature, it might not work correctly for some users who are using an older version of their web browser.
That’s why you, as a front-end developer, need to make sure your code works perfectly on old and new web browsers.
We’ll get to this topic in a bit.
Although JavaScript is a web browser scripting language, JavaScript engines can be used outside of web browsers.
Node.js is an application, or precisely a runtime environment, that uses Google’s V8 engine to run JavaScript.
Node.js makes it possible to use JavaScript to make any kind of application other than a web page.
JavaScript libraries
Imagine you want to build a wooden table, and you need some wood.
Would you go to the jungle and cut some trees, or would you simply drive to the nearest home improvement shop to pick up what you need?
I believe most people, myself included, would choose the latter.
Think of JavaScript libraries as home-improvement shops where you get the material you need to build something.
A JavaScript library is a set of pre-made units of code you can use alongside your JavaScript code.
That way you won’t have to write everything from scratch.
One of the most popular JavaScript libraries (and probably the most popular among beginners) is jQuery.
jQuery at its core is a DOM traversal library. But it also provides features for event management (for instance, what to do when a user clicks on a button) and convenient abstractions for Ajax programming.
DOM is an interface built into web browsers to enable users to manipulate a web page with JavaScript.
For example, display a pop-up when the user clicks on a button or add new items to a shopping cart.
You can only access DOM via JavaScript.
To give you an idea of how a JavaScript library makes a difference, let’s write a block of JavaScript code with and without a library.
The following snippet hides every element on a page, which has the .button class attribute.
First, I write it in pure JavaScript:
let els = document.querySelectorAll(‘.foo-bar’)

if (els && Array.isArray(els)) {
    els.forEach(el => {
        el.style.display = ‘none’
    })
}
Now, let’s use jQuery to achieve the same thing:
$(‘.foo-bar’).hide()
Don’t worry if you’re not familiar with the syntax (yet!). It’s just to give you an idea of how libraries simplify everyday programming tasks through layers of abstraction.
Should you use a JavaScript library or not is up to you.
Thanks to the modern JavaScript and reactive frameworks (such as React, Vue, or Angular), the popularity of JavaScript libraries has decreased over the years.
However, using them is still perfectly fine for many use cases.
Web APIs
Every complex system works via a set of interfaces. For example, a TV allows you to change the volume via the remote control – by pressing a pair of buttons.
An API (Application Programming Interface) does a similar job to a TV remote control; It helps us communicate with a complex system without knowing how it works internally.
In the web context, there are two types of APIs: Browser APIs and Third-party APIs.
Browser APIs
Browser APIs enable us to use advanced features of the browser via JavaScript.
- Audio APIto manage audio
- DOMto manipulate HTML elements on the fly
- Video APIto manage video playback
- Notifications APIto control browser notifications
- Geolocation APIto use users’ location data if they authorize you to do so
- Client-side storage APIsto store data in the browser’s local or session storage
- Canvas APIto draw graphics on a webpage
See the full list of Web APIs on MDM.
The only way to use the browser APIs is from the JavaScript code.
However, Web APIs are not a part of JavaScript itself.
Web APIs are your web browser’s features, and JavaScript will help you use them programmatically.
For example, here’s how you can use the browser’s Local Storage API to store and retrieve a value:
// Store a key/value pair
localStorage.setItem(‘keyName’, ‘Some Value’)

// Or fetch it
localStorage.getItem(‘keyName’)
Third-party APIs
Third-party APIs are located on a remote server and are used for the exchange of information.
You can use the weather API of a weather forecast agency to receive weather information and display it on your web page.
In this case, the weather API gives you access to the weather information stored within its underlying system (usually a database).
Having third-party APIs isn’t limited to big organizations, though. Every team (of any size) can develop an API to exchange information across its applications, such as the main website, mobile apps, partners’ websites, etc.
Knowing how to use Web APIs (Browser-based or Third-party) is an essential skill for front-end developers.
Data-Interchange formats
Third-party APIs enable two systems (e.g., a website and a weather forecast agency) to exchange data.
However, the data should be exchanged in an agreed format both parties can understand.
The most common data-interchange formats are JSON (Javascript Object Notation) and XML (Extensible Markup Language).
Most programming languages (including JavaScript) provide features to parse JSON and XML data.
For instance, the weather information could be presented in JSON and XML like so:
JSON:
{
    “temp”: 282.55,
    “feels_like”: 281.86,
    “temp_min”: 280.37,
    “temp_max”: 284.26,
    “pressure”: 1023,
    “humidity”: 100
}
XML:
<forecast>
<Temp>282.55</Temp>
<FeelsLike>281.86</FeelsLike>
<TempMin>280.37</TempMin>
<TempMax>284.26</TempMax>
<Pressure>1023</Pressure>
<Humidity>100</Humidity>
</forecast>
When you decide to use an API, first, you need to know the API’s response format and write our program accordingly.
Many developers swear by JSON because of its ease of use, making it the most common data exchange format for third-party APIs.XML still has its place in many use cases, though.

Reza Lavarian Hey 👋 I'm a software engineer, an author, and an open-source contributor. I enjoy helping people (including myself) decode the complex side of technology. I share my findings on Twitter: @rezalavarian
Never miss a guide like this!
Disclaimer: This post may contain affiliate links. I might receive a commission if a purchase is made. However, it doesn’t change the cost you’ll pay.